🛁 Slip into Safety with Style!
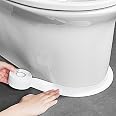
The Safe Way Traction Bath Mat is a 16" x 40" white adhesive vinyl mat designed to enhance safety in your bathroom. With a fine textured surface for improved traction, it features a peel-and-stick installation method, making it easy to apply on smooth surfaces. Its low-profile design reduces trip hazards, ensuring a safer bathing experience.
| Item Weight | 0.01 Ounces |
| Item Dimensions L x W | 40"L x 16"W |
| Size | 16WX40L with drain cut out |
| Shape | Rectangular |
| Color | White |
| Material Type | Vinyl |
A**!
great find!!
I stumbled on to this when I was searching for an anti slip product for my bathtub. I have been using a matt but we were expecting company and I didn't want to bother them to deal with the matt. Plus I didn't want the matt to catch alot of hair as I already have something like that at the drain, so was looking for something that looks good and functional. When I saw this and read the reviews, I thought, why not? Boy, I am glad I purchased it!What I love about this:1. the size: easily fits my tub from one end to the drain. It's perfect!2. the anti slip grip is subtle but works well. It's not highly bumpy, just has tiny, tiny grains of bumps, almost like dull sandpaper like3. sticks well! It's been almost 2 months since I installed it and the edges aren't curling or peeling off. And this is from DAILY showering in that tub. I am quite impressed by the quality.4. very thin but very functional, not heavy or thick like the rubber matts.5. it's forgiving enough when you install it and make mistakes. Meaning if it's not straight or if you have bubbles, you can peel it right away and fix that. BUT you really need to have 2 people working on this to help straighten out the bubbles.One thing though to know is, the item is delivered flimsily. Meaning it is just a thin roll of paper, folded, but don't worry, it will not keep that shape when you install it. Just unroll/unfold it for a day or two, have something heavy on it to help straighten it out. Once you peel the backing, folding parts will not be visible.I honestly am very impressed and so very pleased with the product! It looks great, not cheap and works great!
R**H
Works great and easy to apply
Before and after pictures. I live in a rental and I’m pregnant so I didn’t want to ask the landlord to re glaze the bathtub because of the strong fumes. I decided to initially use a bathtub patch but as you can see, it made it look worse. So I decided to peel the patch then give up half way. I put this on and it was so easy! I know there’s a huge bubble due to the initial patch and the peeled paint, but I think it looks great. I couldn’t align the product with the drain hole because my main concern was covering the peeled paint but I think it looks good. So much cleaner. I haven’t used it yet so hopefully it stays looking nice.
D**N
The last bath mat you will ever buy!
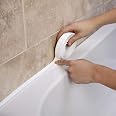
Mine and my wife's only regret is not finding out about peel and stick bathtub mats 30 years ago. This mat is thin and sticks directly to the tub, so you can hardly tell it's there. Unlike suction cup mats that are bulky and have a tendency to slide around as well as get mildew underneath. Straightforward and simple installation, non-slip surface, and long length make this product a winner in all aspects. Everyone should own one of these.As for installation, if you're a perfectionist like myself, it can be as tricky as installing a cell phone screen protector. I still have a couple of very small bubbles that I couldn't get out, but these in no way affect the usefulness of this product, and truth be told you'd probably not even know they're there.As per included instructions, do not use a cleaner that contains silicone or other particles (no Soft Scrub, Ajax, Comet, etc). Here's what I did: Spray the tub with Fantastik and let it sit for 10 minutes. Wiped it down with a wet washcloth. Sprayed it again with Fantastik, wiped it down and rinsed it with hot water. Let the tub dry. Lay the mat down in the tub BEFORE peeling off the backing. Align the mat in the tub making sure to keep it far enough away from the drain that it's not on the downward curving part of the tub. Make sure sides are paralell to the tub walls. Now take a pencil and mark the corners by the tub drain, as well as every 8 inches along the side of the mat closest to you. These mark will help with alignment as you install the mat.Manufacturer's directions: Peel the backing by the drain cutout back about 12 inches and crease the backing paper so it's folded back on itself. Lay the mat in the tub and carefully align it to your pencil marks, being sure to stretch it taut from side-to-side. Reach underneath and pull the paper back another 12 inches. During this process you can lift the mat back up and reposition it as long as you don't press firmly to make it adhere.What I did differently: The manufacturer's method of "peel and stick as you go" would probably work fine if you had two people. One to align and stick the mat while the other holds the opposite end up and peels the paper. I was doing this alone, so I found it easier to peel the entire backing off and start on the outside edge of the tub, aligning the mat with my pencil marks and working my way from the outside to the inside of the tub, rather than from drain to rear of tub.No matter which method you use, it's inevitable that you're going to have bubbles. Especially if your tub has those textured bumps that seem so prevalent nowadays (mine has these). I just happened to have a 4" hard rubber roller that's normally used for applying veneers. I used this and rolled from the center of the tub out toward the edges and got 99.9% of all the bubbles out without a problem. The key here is that the bubbles will "walk" out to the edges as long as you have NOT pressed firmly and caused the adhesive backing to stick really good. Once it's firmly stuck down, any bubbles in the mat will not want to budge.If you find yourself stuck with too many or too big bubbles under the mat, use a knife or razor blade to carefully pry up one corner of the mat and peel it off the tub until you get to the problem area, then re-stick it back down. If you don't have a roller, I suggest standing on the mat with bare feet and firmly pressing it in place at the end. The glue is waterproof, so once it's stuck down you can use it immediately.If you used pencil to mark the corners and sides, you can now use a little Soft Scrub and a toothbrush, or Fantastik and a sponge to remove the pencil marks.UPDATE: It's been about 6 months now since we purchased and installed this bath mat. This mat is so low profile and so maintenance-free that you literally almost forget that it's even there. I can pretty much guarantee that if you've been using suction cup bath mats and you switch to this, you'll never want to go back.
B**Z
Great product, wish I ordered sooner
Better than a bath mat. Great value, easy to install, white in color no yellowing, easy to clean. We've had it now for a few weeks it has good traction and adhesion is strong. There were no instructions in the box however there is a reviewer who gave great installation advice and we followed that!
B**T
Work Great
I have purchased these a few times. They work great and only need replaced about 1 time per year if adhered correctly to your tub or shower floor.
A**R
Well worth the Money!
I Like this product it give a good look to my Tub after giving it a thorough cleaning. It was also easy to apply and has great grip when showering.
Trustpilot
1 day ago
2 weeks ago