❄️ Keep your Pi cool and your setup cooler!
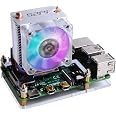
The ICE Tower Cooler by GeeekPi features a 5mm copper heat pipe and RGB fan lighting, delivering efficient, quiet cooling for Raspberry Pi 4, 3B+, and 3B models. Powered via 5V from the Pi itself, it offers easy installation and stylish case compatibility, making it the perfect upgrade for performance-focused makers and professionals.
| Manufacturer | GeeekPi |
| Part number | EP-0107 |
| Item Weight | 141 g |
| Package Dimensions | 10.01 x 8.2 x 6.1 cm; 141 g |
| Item model number | UYH6 |
| Colour | Clear |
| Material | Copper |
| Voltage | 5 Volts |
| Noise Level | 50 dB |
| Batteries included? | No |
| Batteries Required? | No |
J**C
Best cooler for raspberry pi 3B/3B+/4
I love how easy and fun it was to put together and install. It fit my 3B+ perfectly.I wasn't keen on the pre installed color changing fan so I swapped it for the included plain black one.They also provided spare screws and fixings in case you misplaced the original ones.The fan is whisper quiet and keeps the pi nice and cool.I love this tower cooler and I am going to put one on all my raspberry pi's.Would strongly recommend.
K**R
Best Pi 4 cooler by a mile
First I should point out that the box I received had Pi 3 model B on the side label but I had a Pi 4 (worried ....)In the box was only 1 set of brackets not 2 with no label on them (worried more ....) BUT they did fit the Pi 4 as expected (I think maybe the V 2.0 of this product may have a universal bracket set now ?)I used MX4 thermal paste instead of the included sticky pads which worked well.I intended to build a fan controller with a MOSFET but it is fairly quiet and I have not needed a speed controller as yet.Also the V 2.0 fan is not just the blue led but changes colour and intensity constantly, it looks quite cool.The kit also comes with a perspex base plate which is useful and protects the board from scratching the surface it is onas you can't use any case due to height of the cooler.Now for some temperature results :-Pi 4 has no case and is overclocked with overvoltage=6 Arm_Freq=2147 and GPU_Freq=750 (so pushed to the very limit) and running 64 bit kernel. Room temperature at 23 C.When idle on the Raspbian desktop the temperature is 30 C or lower !When pushed with 'stress --cpu 4 --timeout 360' command to load all cpus to 100% the temperature at the endis only 43 C and drops back below 34 C in a matter of seconds once command ends.The whole Pi 4 is much snappier and very usable for general desktop process now.Only negative is I can't fit the 40 way ribbon cable for my t-adapter/breakout board due to too little gap between thecooler bracket board standoff's and the GPIO pins. I can however run individual pin cables across to the t-adapter which is fine as I don't need that many, never needed anything close to all 40 at any time.The best product I have ever added to my Pi.Edit: I have found that a GPIO header riser fits OK and the ribbon cable for the breakout adaptor can be attached to the riser without any issues.
E**.
Best cooling solution for raspberry
The product is perfect for cooling my rasperry pi 4, I used before other solutions like small heatsink fins and even an aluminium heatsink case without having similar results.With my previous case (an aluminium heatsink block all around the raspberry) the raspberry temperature was hovering around 50 degrees celsius, with peaks up to 60-65.Since upgrading to this heatsink, my temperature has gone down to ~33 degrees celsius (I attached a screenshot of the temperature graph), with a maximum of 35 degrees celsius.I haven't tried to overclock the raspberry yet, but it's clear that with this heatsink you have so much more headroom.I attached the fan to the 3v3 pin on the raspberry and it's super silent (~ 38dB - same as a good grade "Noctua" computer heatsink).The LEDs on the fan give it a "computer modding" feeling that is quite nice and captures the attention, these are automatic.The only downside (if you consider it a downside) it's that it occupies more space compared to other solutions, and it's quite difficult to find a case in which it fits. This is not a problem however If you do like me and decide to keep it outside a case. It looks so cool that I don't want to hide it away anymore :DOverall, this ticks all the boxes, It's perfect!
A**R
Fan needs to be turned 90°
This has thermals of 27-30° idle at a 2000MHz overclock and ramps up to 34° under moderate load. Stressberry doesn’t seem to work for me at the moment so I can’t test high loads but there’s no way it can’t handle it.Put some tape either side of the heatsink to cover the gap between it and the fan (see picture) for a noticeable drop in temps. Lots of air escapes either side.The black fan is an amazing inclusion, you order the led and get the black fan free. Use the black one. The cooler should be rotated 90° to give space for the ram chip to accept a heatsink, heatsinks need to be short to fit under the two tensioning arms. You cannot cover the whole ram chipset with a heatsink because of the heat pipe, either a heavily trimmed one or two small, short ones can be used instead.The standoffs are hard to screw on from the top without bending pins so I strongly Advise screwing them in from below, this means you probably want to have the fan assembled first. Ie, put the black fan on in place of the rgb one - screw on the tensioning arms - put the standoffs through the holes in the arms - put the nut on and tighten fully -Important - use some thermal paste instead of the pads, I’m using arctic mx-4 because it was the first one I saw that was cheap and well reviewed, use another brand if you have it to hand. I used the plastic film from a thermal pad to spread out the thermal paste a bit.- after putting thermal paste on the cpu, place some standoffs through the pcb - put the fan assembly on top and slowly tighten each of the bottom standoffs in a cross pattern. This will slowly lower the fan onto the board - once it’s tight, add the acrylic and screw in.I’m not responsible if you break your pi, don’t over tighten the standoffs onto your pcb.Side note: the other model that faces downwards (the low profile) is probably better because it can push heat over the power managing chips (they get hot overclocking) but I can’t test this myself. I have heat sinks on the two bigger chips next to the ram and a shaved down sink on the ram itself, facing the same direction as the airflow.
Trustpilot
1 month ago
2 weeks ago