

💦 Keep Your Water Clean and Clear!
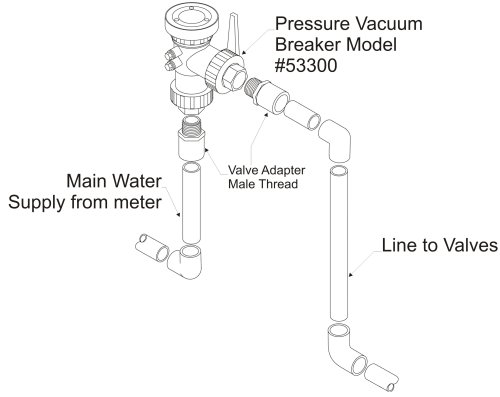
The Toro 53300 1-Inch Sprinkler System Pressure Vacuum Breaker is designed to prevent back-siphonage of contaminated water, ensuring your potable water supply remains safe. With a user-friendly twist-off cap for easy winterization and built-in unions for effortless maintenance, this lightweight and durable device is compatible with any irrigation system, making it a must-have for any responsible homeowner.
| Brand | Toro |
| Color | No Color |
| Material | Plastic |
| Item Weight | 1 Pounds |
| Global Trade Identification Number | 20021038533005 |
| Manufacturer | Toro |
| UPC | 021038533001 |
| Item Package Dimensions L x W x H | 8.27 x 8.15 x 5.51 inches |
| Package Weight | 0.91 Kilograms |
| Item Dimensions LxWxH | 4.8 x 8.5 x 9.8 inches |
| Brand Name | Toro |
| Warranty Description | Warranty |
| Model Name | Toro 53300 1-Inch Sprinkler System Pressure Vacuum Breaker |
| Suggested Users | Unisex-Adult |
| Number of Items | 1 |
| Part Number | B000A1E6B8 |
| Included Components | Toro 53300 1-Inch Sprinkler System Pressure Vacuum Breaker |
| Size | No Size |
C**A
Part was original Toro equipment
Part was original Toro equipment. Purchased from Amazon Market place as used/reboxed. Part was in perfect condition worked like new.
B**H
Effective and cheap
This device works fine for my application (residential with plastic pipe), but it does need to be thoroughly bled for winter to avoid freeze damage. Easy to assemble and seal, and there doesn't seem to be much alternative at this price.Update 12/31/12 After five years use still going strong, a dab of plumbers grease helps lubricate the sealing rings, meanwhile 3 neighbours have had their brass PVBs fail, split and leak due to incorrect or incomplete bleeding during winterizing. On the upside, brass 1" PVBs seem to have reduced in price to within $10-15 of this one so there is more choice, on Amazon at least.
B**O
Good design
Had to replace the bronze unit after an unseasonal freeze. The great thing about this one is that it has two pipe and nut joints so replacement in the future should not involve having to cut and replumb the pipes.
L**L
Good Replacement - Instructions were horrible.
We moved into our house and this PVB was installed. I forgot to winterize the PVB and suffered from freezing. I received this product in two days thanks to Amazon Prime. I installed the following weekend. The PVB was the exact same one that was being replaced. The instructions for the Toro PVB were horrible and if you was a beginner DIY'er you would be lost. This is the reason I'm giving it 4 stars. Hence the reason I'm writing this review. I did a little plumbing early in my life so I knew what I needed to do but I feel sorry for a person just getting his fingers wet. So, I wrote this review in non plumbing people language. LOLWhat I used) 1) Toro PVB 2) 14" plumbing wrench 3) Thread Seal tape 4) Water Curb key 5) pliers or vice grips 6) terry towel or any type of small towelWhat I did to Remove old PVB........ 1) turn off the main water source to my home connected to my water meter ( I used a water curb key (paid $8 for Lowes). I then made sure both valves were open on the PVB. Next, I unscrewed both screws n the back of the PVB using pliers and fingers. Make sure you take both of them completely off. This will cause the water in the PVB to come out (Remember make sure main water source is turned off). Then, I took my small towel and unscrewed the two large rings that are around the metal 1 inch connectors (if looking at the picture or the PVB , 1 ring is on the left and 1 is on the bottom ). be careful because once you unscrew these rings the washers may fall out. once the rings are off then you can use the wrench to unscrew the metal connectors from the PVC pipe. Remove old PVB unit.To put on new PVB pipe.. I threaded both ends of the PVC with thread seal tape. be sure to tape all the threads on the PVC pipe. I then took the whole PVB unit and screwed it on the bottom PVC pipe. Do not unscrew the rings to do this. Just make sure that the PVB is screwed on all the way down on the bottom PVC pipe. Also make sure that the other ring is parallel with the left PVC pipe. This left ring will have to be unscrew and placed around the PVC pipe (I let it rest on the ground), Just make sure you know the alignment of the washer inside the metal connector.. I took the metal connector and screwed that on the PVC pipe and use the wrench to tighten. I then re-aligned the internal washers correctly and re-assembled the metal connector to the PVB pipe. Next thing I did was take the the large ring and screwed it over the metal connector and onto the PVB pipe. I then took the small towel and screwed the ring as tight as I could. Make sure the two valves on the PVB are set to close. Also "Do Not" touch the two small screws in the back.I then went back to the main water line and turn the water back on using the curb key. I then turn the two valves to open. The water rushed through and the PVB leaked for a couple of seconds but the PVB soon became pressurized and created a seal. To make sure that it is pressurized take a towel and wipe away the water. You may see some small drips initially but they are probably from the water that initially came out. Make sure there is no drips around the PVC-metal connections.I wrote this about two months after I did the replacement. I remember wondering how bad the instructions were written or the lack there of. Hopefully this help someone trying to do this replacement on their own. It took me about 20 minutes after I had the every thing setup. If anyone else have any alternative methods please list in the comments. I couldn't find any DIY videos to link to this so please help others trying to do this replacement.
M**Z
Don’t attempt to do this yourself if you don’t have common sense and have some experience with sprinkler system installation
Although it came with very basic instructions, YouTube came to the rescue. Keep in mind that we are fairly savvy when it comes to irrigation systems so this was not a brain buster for us, but it is always nice to have some good thorough instructions for those DIYers as it can get complicated and frustrating if you don’t know what you are doing. For this installation, we decided that it was easier to dismantle the defective one by just simply cutting the 2 PVC piping right in the middle, then buy 2 couplers, 2 1” PVC piping and PVC glue. We connected one end of the two 1” PVC pipes to the Pressure vacuum breaker and the other end we connected it to the other end of the PVC pipes that were already on the ground using PVC glue and the 2 couplers. If you try to do it any other way, you will end up dismantling the new Pressure Vaccum Breaker in such a way that you will get frustrated and end up tossing the darn thing in the garbage.
A**R
Good
Very good
V**S
Started knocking after 1 year of use,
I have installed one in 2014, and worked for 5 years. In 2019 I had to replace it as some connectors just broke off. That one worked 1 year, and now it starting Knocking problem and water wastage. My plumber inspected it, all parts are good. It worked for 2 watering stations on my Sprinkler system , and with the 3rd started Knocking again. Not sure whats the problem , and a solution..
T**D
Easy replacement
I ordered this to replace an old Toro 53300 that was leaking. It was very easy to install. I work slowly, so it took about 30 minutes to remove the old one and install this new one. The old one could have been serviced with a repair kit (the O-rings had worn out), but I prefer having a whole new assembly. I don't have any problem with this being a plastic valve because the rest of the irrigation system is PVC and plastic, too.The old PVB lasted (I'm guessing when the previous owner installed) about 10 years before it developed a leak. So I expect a similar lifespan for this part.
Trustpilot
4 days ago
2 weeks ago
