🚗 Elevate your engine game with the ultimate oil filter housing!
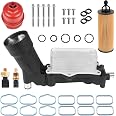
The Somusen Upgrade Full Aluminum Engine Oil Cooler Filter Housing is a high-quality replacement part designed for various Chrysler and Dodge models from 2011-2016. Made from durable aluminum, it enhances cooling efficiency, prevents leaks, and extends engine life. With a vehicle-specific fit and a commitment to quality, this product is essential for maintaining optimal engine performance.


| Brand | Somusen |
| Material | Aluminum |
| Product Grade | Replacement Part |
| Vehicle Service Type | Car, Sports Utility Vehicle |
| OEM Part Number | 5184294AE, 5184304AE, 5184304AF, 5184294AD, 5184294AC, 68105583AG, 68105583AF, 68105583AE, 68105583AD, 68105583AC, 68105583AB, 68105583AA, 68308741AF, 68308741AC, 68308741AB, 68308741AA, 68310865AF, 68310865AC, 68310865AB, 68310865AA, 68365925AD, 68365925AC, 68365925AB, 68365925AA, 68365931AD, 68365931AB, 68365931AA |
| Manufacturer | Somusen |
| Number of Items | 1 |
| Automotive Fit Type | Vehicle Specific Fit |
| Model | Engine Oil Cooler and Filter Housing |
| Item Weight | 5.71 pounds |
| Package Dimensions | 16.69 x 10.51 x 4.72 inches |
| Country of Origin | China |
| Item model number | EOFA-1116BKRD |
| Exterior | Metallic Finish |
| Manufacturer Part Number | EOFA-1116BKRD |
K**D
Fit 2016 grand cherokee, works great
I installed this in my 2016 jeep grand cherokee in October of 2024 and it is currently may of 2025. I have had no issues whatsoever. I did not use the provided gaskets/O-rings for the oil cooler itself or for the upper & lower intake. I broke my origial oil temp sensor when trying to get it out so i used the provided one and it seems to work just fine. I did use Mopar O-rings for the cooler and Fel-pro gaskets for the upper and lower intake. This was a one day job for me and took around 6-7 hours. I work on things regularly but im not a professional by any means. Make sure you have the E-torx sockets you need before attempting this job. But anyone with common sense and a YouTube tutorial can do this.
A**.
Perfect so far…
4/8/2025Installed this unit on my 2015 2door JK 2 weeks ago. Seems quality built. I would say that if you are considering doing this on your own, be sure to watch a few videos on youtube to make sure you are confident you can install it on your own. It isn’t necessarily too difficult, it is just very tedious; take your time.A few notes to make sure you don’t have to do this job twice:1. DO NOT use the O-rings and gaskets they supply you with in this kit. They are noticeably low quality. Buy and use the OEM pack:Mopar Engine O-Ring Kit - 68191356AA2. DO NOT use the pre-installed sensors on the unit. I unfortunately had to do the job twice. The jeep threw engine light and codes after I was done because it did not recognize the coolant temperature and oil pressure sensors on the unit. Order OEM or OEM quality sensors. All you have to do is unscrew them from the unit, and screw on your quality replacements. After re-installing with new sensors. Worked like a charm, no engine light or error codes given. The sensors i ordered are:Dorman 926-188 Engine Oil Pressure SensorMopar 5149077AB Coolant Temperature SensorOverall, great alternative to original. You are saving a lot of money going with this unit, but dont skip out on the O-ring gaskets and the sensors; even adding those purchases, you are spending considerably less than half the cost of the OEM replacement unit, and not to mention the hundreds on labor costs. If you are gonna do it, do it right, with the OEM quality O-rings, gaskets and sensors.So far, the housing is working perfectly. Will update in a few months.
K**A
Replacement Part for a 2012 Dodge Journey 3.6L SXT
Perfect fit! I DID replace the gaskets as well as the ones included in the set do appear to be on the cheap side- However I left the sensors alone and it had no issues recognizing the new equipment.
W**0
Use OEM sensors & gaskets instructions in review
Install instructions below!This job takes a decent amount of time. For me the longest part was cleaning out the valley once you pull the lower intake plenum off. Drain your engine oil 1st & a good amount of coolant to minimize mess made when pulling the housing off.I highly suggest using OEM mopar gaskets for housing the block mounting. I also personally used OEM sensors. I’ve read reviews for the dorman and every brand metal housing offered. The issues are all gasket and sensor related. I also suggest replacing the spark plugs when doing this job. They are due at 100k miles. Rock auto has the oem champion plugs at amazing prices compared to the mopar stamped champions at $20 each. Unless you know how to read spark plug heat ranges always go oem with spark plugs or run the risk or them not working well.If you have not replaced coil packs I also suggest doing that at this time. Mine started to fail at 69k miles! Lastly there is a rubber oil line hose that comes off this cooler assembly. Now is the ideal time for that as well.I got a new set of mahle intake gaskets as well. I also ditched whatever no name oil filter they provide with this kit.There is plenty of videos on YT to guide you along if I missed a step but here is how it’s done.1)drain engine oil & loosen oil filter cap to help oil drain down.2) drain 1 gallon or more of coolant from lower radiator to T stat housing hose from under car is easiest.3)Remove upper intake air box cover and induction hose. Disconnect MAF sensor & plastic rivet holding into intake. There is no clamp holding TB hose on just twist the intake hose toward windshield to replace ball sockets holding air hose onto TB.4) remove TB and connectors around it and set harness out of way. Also remove brake booster(check booster hose for cracks. VERY common failure item $43 on rock auto and vacuum hose on TB.5) remove two 10 mm nuts holding rear intake bracket near TB area. 13mm stud also holding rear brkt on. Move wiring stud loop off stud to expose. Remove two 10 mm nuts under front intake. They are under the upper radiator hose. Don’t remove the front lower bracket mounts. Not needed!6) remove loosen 8mm bolts holding upper plenum down there is 7 of them. DO BY HAND!! Plastic garbag intake with coarse screws won’t last too many times. Impact guns will ruin the threads very fast.7) remove upper plenum pull from rear by cowl and should pop free. Put rags in intake holes.8) remove all coil pack electrical connector and fuel injector connectors. The injectors have red tab u pull up 1st then release connector. Lay harness out of way after remove push x mas tree retaining clips from harness.9) remove fuel line or u can leave connected and swing lower plenum out of the way after remove lower plenum 8mm bolts. Use hand tools! Plug cylinder head holes with rags.10) remove five if I recall 10mm E socket or inverted torx bolts holding oil hosing down. Be ready for a mess when you pull straight up on housing. Have WET shop vacuum or fluid pump handy there will be a huge mess once it’s pulled free!11)tape off or plug holes into engine. Use brake clean and long q tips or cotton swaps and rags. I sprayed brake clean let it soak. Vacuum it then repeat 4-5 times as needed. The more debris you leave in this engine valley the more smell the engine will always have after!12) clean all block mating surfaces.13) lubricate oring on new housing that’s the main feed tube. This will prevent the gasket from rolling or tearing on install where it goes into the block. install new filter housing with new mopar gaskets or roll the dice. 68191357AB is new updated #. Temp sensor #5149077AB the oil pressure sensor is dependent on vin # go on mopar websites and run vin for correct oil sensor # or call local dealer14). Change spark plugs and coils before installing lower plenum harness. Gap to 0.043” they are NOT pregapped as they claimed. They are way off!15) add .5-1qrt of engine oils to flush oil pan & drain.16) reinstall all parts in reverse order with new intake gaskets upper & lower (mahle or felpro work well)17) refill engine oil after draining it again.18) remove upper radiator hose and fill with coolant/water.19) turn heater on inside car and start engine. Check oil housing area for leaks. Let engine run a bit and loosen bleeder screw in T stat housing the purge air from system. When it leaks coolant from the bleeder screw should be purged of air. Top off cooling system & check engine oil level.20) once cooling system is bled of air and coolant temp is at normal should be good to test drive. Take on short local drive watching temps and idiot lights don’t come on.Book time on labor is 2 hours. Without a lift (for oil draining and coolant draining ) and cleaning that engine block valley it took me most of the day!You can do it! Take your time and be sure you have E sockets or inverted torx bits. Harbor freight had them for $13 for a set.I will update if I have any issues. Did this job at 130k. Not leaking but common issue failure at around 120-150k miles that can ruin the engine if housing fails mixing coolant and oil. Going on 8 hr road trip soon.
J**.
Nice design, works great.
Worked the way it should. It did come with a coolant temp sender, the vehicle that I was working on did not have one. I left it in place the way it came and it did not interfere. Worked great...
Trustpilot
1 month ago
1 month ago