🔩 Crimp Like a Pro — Precision, Power & Comfort in One Tool!
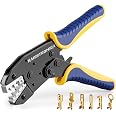
The haisstronica Crimping Tool is engineered for professional use with non-insulated open barrel terminals, supporting wire sizes AWG 20-10 (0.5-6.0mm²). Featuring a precision ratchet mechanism and adjustable crimp force, it guarantees secure, damage-free crimps. Its ergonomic nylon handles and quick-release lever ensure comfortable, efficient operation. Compatible with popular connectors like Dupont, Molex, and JST, this durable chrome tool is designed to elevate your electrical wiring projects with reliability and ease.


| Manufacturer | haisstronica |
| Part Number | HX1219 |
| Package Dimensions | 27.8 x 10.8 x 2.6 cm; 550 g |
| Item model number | HS |
| Colour | Chrome |
| Shape | For Non-Insulated Open Barrel Connectors |
| Handle material | Nylon |
| Usage | Professional electrical work, crimping non-insulated open barrel terminals, automotive wiring, home electronics assembly |
| Batteries included? | No |
| Batteries Required? | No |
| Item Weight | 550 g |
P**D
Glad I bought The 6 Piece Kit.
I bought this crimping set at the same time as buying a Ferrule crimping kit, as I needed to rewire my trailer. I did weigh up buying everything I needed for the rewire against paying for it to be done at tow bar fitting centre, and whilst there probably wasn't too much in it, decided that should I have any future lighting problems, at least I'd have an understanding of how it all worked and could solve any problems without taking the trailer back. The Ferrule crimper did a fantastic job of connecting the 7 pin socket and connecting all the wires to a terminal box, but the lights all required Female connectors, and the reason why I bought Haisstronica. I had intended to buy the tool as standard for use with insulated crimps but at the last minute I opted for the 6 piece kit, just in case, and I'm glad I did, as the lights required non insulated female crimps. I've since used the crimper on another project with insulated crimps, so I'm happy the 6 piece kit was the right choice. I will say that with all the non insulated crimps, I had to use thin nose pliers to bend all the sides of the crimps in for the crimper to work correctly, but I'm going to say this was down to the crimp and not the tool. Perhaps I need to buy some decent quality crimps to confirm this, but for now, I won't change the 5 star rating. The tool is well made and presented in a nice case, the only negative I have is, I'd love to know what they used to tighten the screws up that hold the jaws in place. The screws were so tight I sprayed them with WD40 and still broke the head of my screwdriver! Perhaps it was just it's time to give up after 15 years of use! Someone with small hands may struggle a bit to get to grips with this tool and you do have to give it a proper squeeze to make the sure the crimps are secure, but the results are perfect.
H**X
Good quality crimp jaws
Work well. Good quality, well shaped crimp jaws ensure a nice, tight crimp.
A**R
Crimping pliers
Excellent quality very easy to use and very good price highly recommended
N**N
Value for money
Yeah, arrived on time. Great value for money better than the one I had Crips lovely does a fantastic job. Recommend it to anybody.
G**M
Works well -once you understand how to use it...
Successfully attaching spade connectors has eluded me for some time. There are a number of You Tube videos which are in conflict as to how these tools are used. Having bought what seemed to be the full range of tools for connectors I realised the key is to understand the very substantial difference between 'insulated' and 'non insulated' spade connector approaches. This is tool is for 'non insulated' as the name implies no hard plastic red, blue or yellow collars. One, make sure you have the correct connector for the wire to be connected. it's either mm2 or AWG - this tool is marked with both. I find AWG easiest to remember. Two, strip the wire sheath (use the correct tool) around a centimetre. Three, place the correct connector for the wire size into the marked jaw of the tool. Pull it through until it stops on the ridge of the internal jaw. (I give the tool a couple of click simply to pretension the connector in tool and stop it falling out). Four, feed the wire into the back of the connector until it stops (this is the insulation hitting the wire crimp). Five, squeeze the tool handles together - depending on what wire you are using it may feel quite stiff. The tool will release when once fully closed and you can pull the wire and connector out of the jaws. There should be the outer crimp holding the insulation, and the inner crimp holding the wire conductor. That's it!! You can buy isolators for these connectors for not much for a hundred (get the right size - and remember to slide them onto the wire first)...
V**O
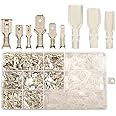
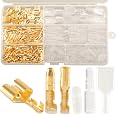
Covers a large range of terminals
This crimping tool kit covers a large range of terminals and works perfectly.
A**T
As described and good value
As described and good value, delivered promtly
P**G
Excellent time saver tool.
Excellent tool. Used to make up vintage car harness. Hundreds of terminals and every one perfect. Gets far better result than manual version which needs twice applying to each. This folds both cable cleat and insulation cleat together.
Trustpilot
2 days ago
2 weeks ago