


🔗 Connect & Create: Your 3D printing game-changer!
The 3D Printer Filament Welder Connector by IdeaFormer-3D is a must-have tool for any 3D printing enthusiast. Designed to connect broken 1.75mm filaments seamlessly, it helps reduce waste and allows for the creation of vibrant, multi-colored models. Made from high-quality all-metal materials, this lightweight connector is compatible with a variety of filament types, ensuring versatility and reliability in your projects.
| Manufacturer | Bell Tech |
| Brand | IdeaFormer-3D |
| Item Weight | 1.94 ounces |
| Product Dimensions | 0.98 x 1.78 x 0.39 inches |
| Item model number | SWH-AL-BK |
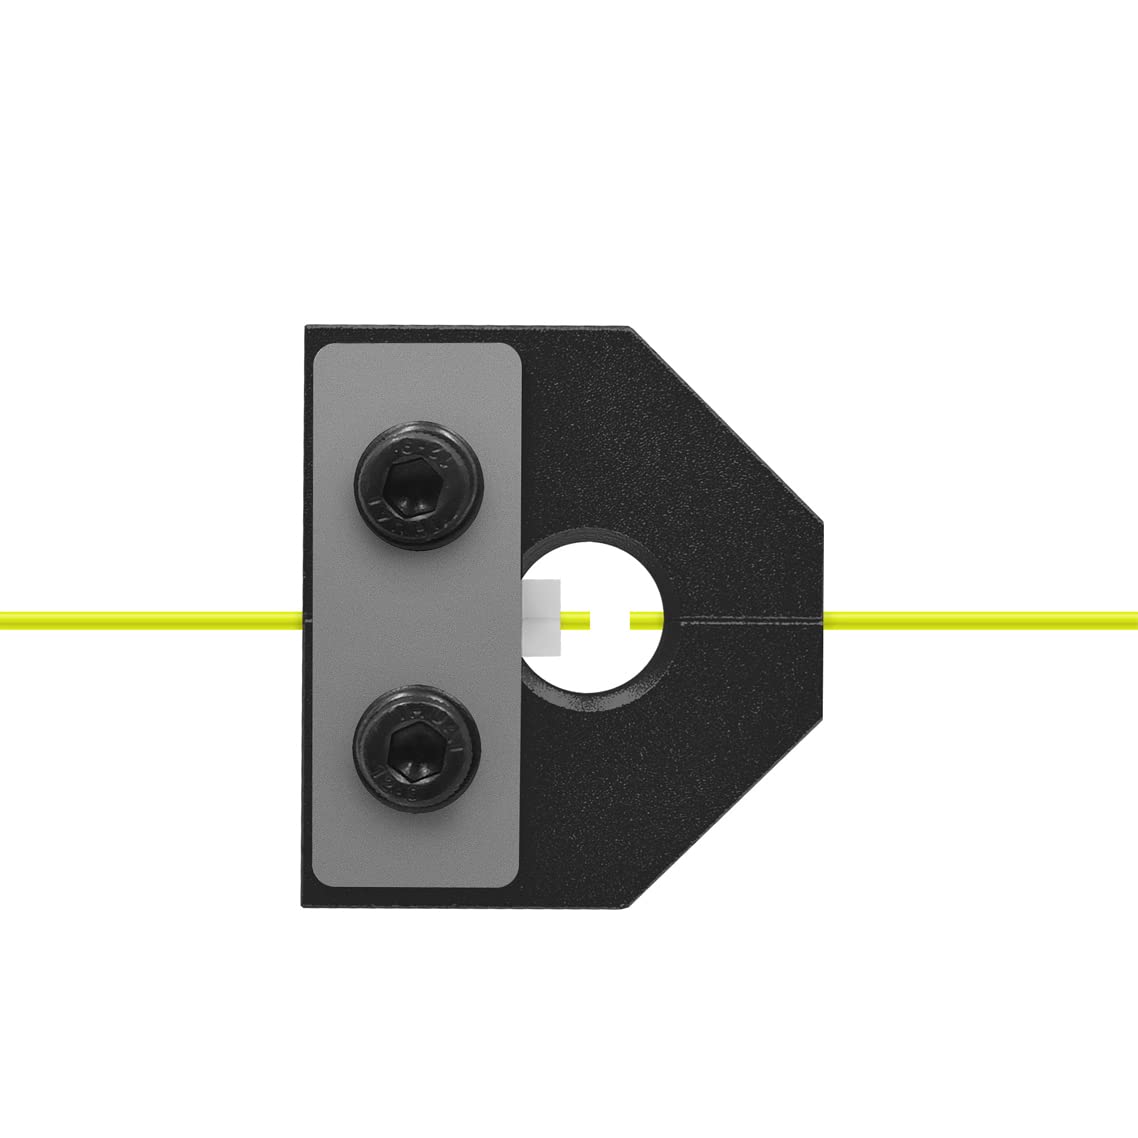
| Color | Black |
| Material Type | Polyethylene Terephthalate Glycol, Polypropylene, Polylactic Acid, Acrylonitrile Butadiene Styrene, Metal, High Impact Polystyrene, Polycarbonate, Polyvinyl Butyral |
| Manufacturer Part Number | Bell Tech |
S**
Actually works.
I was kind of skeptical about this splicer, but I just followed the instructions exactly like the video showed, and it worked perfect. Just a little bit of shaving with my razor blade after the splice and I’m ready to rock ‘n’ roll.
S**N
It works, but...
This product does work as described. However, expect much trial and error as you figure out how best to utilize it, with a fair amount of frustration along the way. After many attempts, I'm now at the point where I have a roughly 90~95% success rate at joining filaments. It was not always this way. It took many, many tries to refine my technique, which I will share below.What has worked best for me, in ordered steps:1: Angle cut the ends of both filaments - just like they were being loaded into an extruder.2: Put a very small segment of Capricorn tubing on one of the filament segments - it doesn't matter which. It does not need to be very long, I use roughly half inch pieces. It is important that its Cap/Blue tubing, as those have a smaller inner diameter. More on this later.3: Insert each segment of filament into the welder tool. I have found it useful to use filament clamps - or regular clamps - to keep the filament rolls from unspooling and turning into a knotted mess.4: Ensure that each end of the filament lines are lined up correctly. Bend the ends as necessary to make sure the line being joined feeds smoothing into the side of the welder tool that has the white insert.5: Use a lighter to heat the filament ends inside the tool opening. Be careful of fumes which are probably not so good for breathing in.6: Immediately push the filament from the small opening side into the white insert side. Rapidly move the filament back and forth inside the white insert for several seconds - long enough for the filament to cool and form a strong bond.7: Open the tool to free the joined filaments. Test the strength of the bond by -PULLING- on both sides of the bond. Do not twist or bend it. If it comes apart, cut the ends and redo the bonding process.8: This is the most difficult part. Carefully sand the bond until the previously applied piece of Capricorn tubing freely passes over the bonded segment. I have read many perspectives on this part that state that rapid sanding should be avoided, as it generates heat that melts the PLA. I do the exact opposite here, and actively attempt to sand as vigorously as possible with a course grit sand paper (I use 120 grit for what its worth). This seems to help the bond fuse, and form the proper dimensions necessary to pass through the cap tube. If successful, proceed to roll the segments into a single spool.Other notes:1: This process typically takes me about 10 to 15 minutes. It is not the fastest method, I'm sure.2: I never attempt join dissimilar filaments. I always join the same brand/type of filament.3: This is merely what works best for me. You will have develop your own technique to achieve success.
J**H
Must take more practice or skill than I have!
The filament joins pretty easily but getting it joined so straight that it goes through the narrow 3d printer tube is another matter. I think it could be done with a lot of persistence and practice. I only tried it a dozen times or so before deciding it was more trouble than I wanted to expend. I did join it perfectly straight enough on one of the attempts but couldn't do it consistently.
A**G
Nice quality
I'm not sure as to how well welding filament actually works as the welds seem to be fairly fragile, but this thing is high quality and works as advertised! If you want to try welding filament together this is a rugged tool that will get the job done.
J**N
Only useful with new spool
I have spent three hours trying to weld two pieces of filament together that are near the end of spool. What is making it so difficult to do is the filament near the end of the spool is very tightly wound and as a result it has a very strong tendency to curl itself back up and it has more pronounced curve to it. The curve in the filament makes it impossible to line the filament up with the opposite hole in the jig so you must first use a heat source to slightly melt then straighten the filament. That's not even the biggest issue, I don't know if its just the lighter I'm using or the filament but from my experience the lighter method they use heats up the outside of figment too quickly. This will cause the center of the filament to not melt completely and what you will end up with is a melted shell around a unfused piece of filament. Which ultimately shouldn't be an issue if your careful not to put stress where the weld is, your printer should be able to handle that little hiccup. the problem is the two spools I'm trying to fuse together want to curl back up in opposite directions and will always break apart the less than ideal weld.It might be possible to weld together filament near the beginning of a spool given how its much straighter and doesn't want to curl back up on itself. Buuuut why would you even want to fuse together 2 new spools together, Its really not that viable for what I would assume to be the biggest use case for this tool. That being said if you really take the time to get really good with it you might be able to get it to work for you. But with the amount of time, effort, and skill needed to get this thing to work at all, it might just be better free handing it.
A**E
Extremely difficult to use, filament will still break if bend radius is too acute.
I have had the product for one year and I have yet to make a successful splice that does not break.The product design is fundamentally flawed. It's too small to handle without burning your fingers, difficult to heat the filament and maneuver, and difficult to control the temperature. Abd even when you do manage to fuse the ends together, the fused joint remain brittle and will snap if the angle the filament enters the extruder is to acute or small. after many hours of attempts I managed to achieve a successful splice only to have the splice break during a print job. Sorry, but I can't in good conscience recommend thus product.
G**)
A super cool accessory that may fit a need for you
Easy to use. works. Useful. This can come in handy, especially for times when you have a break, and you are in a bind. Fuse the PLA back together, and off you go
B**K
works but
does what it is supposed to do. it's a lil finicky to work with. no bells and whistles. a unit with a filament cutting guide to get exact 45 cuts to get easier alignment might be easier for some.
A**M
very good
its work good
F**Y
moeilijk te gebruiken, maar prima kwaliteit
Het is een sterk en stevig product, maar ik slaag er niet in om filament aan elkaar te zetten. Heb al meerdere youtube instructies gekeken, maar het lukt me niet.
S**X
Die textuelle Beschreibung im Artikeltext ist schlimm, das YT-Video hilft.
Aus 3 Resten zwei mal zu einem Strang gespleißt. War eigentlich relativ unproblematisch.Frickelig ist, die beiden Filamente zusammen zu halten, denn die Windungen der Spulen ziehen die Stelle schnell auseinander. Man muss es irgendwie fixieren. Die Stellen sollten auch recht gerade aufeinander zulaufen. Habe es mit dem Feuerzeug sehr kurz erwärmt und dann gerade gezogen mit Vorsicht.Zum Spleißen reicht das Feuerzeug für 2 Sekunden. Danach ins weiße Teil schieben, warten und öffnen.Mit einem scharfen Messer lässt der Übergang sich grob und einfach bearbeiten.Das Filament dabei natürlich nicht brechen lassen und auch nicht die eigenen Finger mit dem Messer treffen.Glatt war der Übergang nach dem Bearbeiten nicht, weil ich gerade kein Schleifpapier gefunden hatte. Wurde aber problemlos eingezogen. Schleifpapier spare ich mir nächstes mal wieder.Wer das Spleißen nach mehreren Versuchen nicht hinbekommt, hat zwei linke Hände. Hat wie gesagt direkt zwei mal auf Anhieb geklappt bei mir.
J**L
funciona bien
Esta bien pero hay que cogerle el truco ,una vez aprendido es facil
L**S
Fyller sin funktion
Fyller helt klart sin funktion, har dock inte testat filament som jag har svetsar ihop ännu.
Trustpilot
1 day ago
2 weeks ago