🚀 Illuminate your adventure with power and precision!
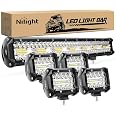
The Nilight 20 Inch 420W Triple Row Flood Spot Combo LED Light Bar kit features a powerful combo beam with triple row LEDs and nest reflector design for superior brightness. Rated IP67 for waterproof, dustproof, and quakeproof durability, it includes adjustable mounting brackets for flexible positioning. The package comes complete with one 420W light bar and four 60W LED pods, perfect for off-road trucks, boats, and vehicles needing enhanced night visibility.


| Brand | Nilight |
| Color | 20Inch Lights + 4PCS Led Pods |
| Vehicle Service Type | Car |
| Auto Part Position | Center |
| Item dimensions L x W x H | 3.1 x 20.2 x 3.1 inches |
| UPC | 781621091409 |
| Assembly Required | No |
| Manufacturer | Nilight |
| Global Trade Identification Number | 00781621091409 |
| Model | ZH415 |
| Item Weight | 5.98 pounds |
| Product Dimensions | 3.1 x 20.2 x 3.1 inches |
| Country of Origin | China |
| Item model number | ZH415 |
| Exterior | Painted |
| Manufacturer Part Number | ZH415 |
T**Y
VERY BRIGHT light, Easy to install.
These lights are AWESOME!!! The flood/spot combo ensures a full area of coverage and SUPER BRIGHT. They are very easy to wire in to a switch or control module. The brackets are easy to mount and make them very functional.
G**N
Led light bar from Nilight.
I have 2015 honda pilot touring I put the light drill two holes through the bumper, put little long bolts through the metal behind the plastic cover it is fits fine. The light comes with everything we need,
R**D
Good product
For me the lights are definitely doing the job and I would recommend
E**N
Great visibility
The media could not be loaded. This was my first time installing auxiliary lights on a vehicle. The process of installation is fairly easy.I installed it in a bull bar that I have on my Ram 1500.The brightest and visibility this lightbar produces was beyond my expectations.This was such a well worth it purchase as I tend to drive at night and it lights up everything.I’ve had these lights for a couple of years now and the brightness has not diminished at all.The only downside I have found is that there is some condensation built up inside the lights, but this has not impeded the brightness of the lights one bit
D**N
Works great
Works great. Very bright
H**S
Perfect
Muy buena luces
G**.
Best lights I've purchased
I have 3 nilites on my utv, 2 on my wife's and 2 on my atv. These are great. Bright, easy to install and I love the mounting system on these. All I buy now.
T**T
Extremely bright, high quality, waterproof. Nissan Rogue
The media could not be loaded. As title says, 100% recommend, not much more I can go on from that. Instructions are clear. I am going to be replacing the included switch for an OEM matching feature switch for my vehicle.A bit brighter than my brother’s 20” from a different brand, he got his for the same price but his came without a mount. This is the best bang for buck high quality brand in my opinion.For those of you looking to install the wiring in Nissan Rogue: For my 2015 Nissian Rogue S AWD, I recommend the following. Firstly, install the mount, then the bar, and tuck the wiring in through the bottom grill (or drill through the mount and bumper if you’d like). Now remove the battery negative terminal if you haven’t already. Open the door on the drivers side and you will see a little slit on the side of the dash a to pull the panel off. Pull that panel and all the fuses will be exposed. Unscrew the two screws holding the hood + gas cover release. Slide that module off. Undo all the clips holding on to the panel under the steering wheel. The entire thing, you want it off. Undo all the tabs and let it drop down. Find the biggest wire bundle and trace it to the back of the Firewall, push hard around the sides and you should be at a large thick rubber grommet. Get a loooong screw driver or metal stick and push through the furthest edge you can, i recommend the bottom left. If that didn’t work, push harder through the 3” thick rubber. Go to the engine now, and remove the battery completely. Unscrew the silver tower thing behind it and move it as far to the left as you can. Unscrew the air intake tube and remove it. Unscrew the air filter module and tube and wiggle it out towards you, it’ll be very difficult but eventually it will come off. Now you should see whatever you stabbed through the grommet. Tape the cable to to the stick WELL and go inside the car and pull it in. Follow the included instructions for your preferred method of the rest of the wiring. For grounding the lightbar and relay, I sanded down at the screw point for the air tube and put one there and the other i used a self tapping screw and washer at the side, anywhere is good, but closer to the battery the better.If you want an OEM feature switch, just go on ebay! Search “[Year] Nissan [Model] OEM feature switch.
Trustpilot
4 days ago
1 month ago