


💡 Unleash the Power of Your Pi!
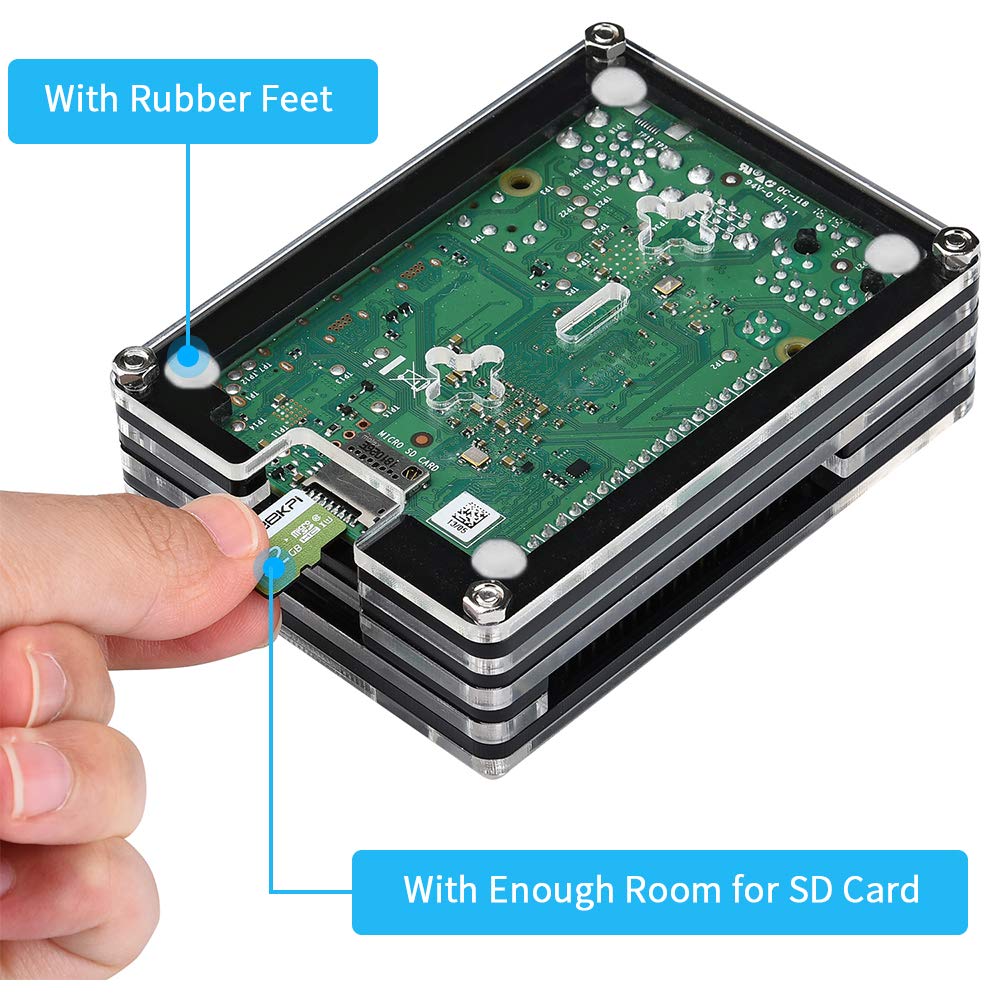
The GeeekPi Acrylic Case for Raspberry Pi 4 Model B is a stylish and functional enclosure designed specifically for the Raspberry Pi 4. It features a 9-layer acrylic design, a cooling fan, and heatsinks to ensure optimal performance and heat management. With easy access to all ports and straightforward assembly, this case is perfect for tech enthusiasts looking to enhance their Raspberry Pi experience.
P**G
Great Product (but read this before you buy)
This is a great product, but for those who haven't much experience with Raspberry Pis, should read this.The product is great but the instructions are only good. They omit one critical detail, which is how to connect the fan. I did research and found the answer; The RED wire goes onto GPIO pin 4 which is the second one from the left on the top row when orientated so that the USB ports are to the right. The BLACK wire goes onto pin 6, which is the next one to the right, i.e. the third pin on the top row.The pins are orientated thus :-2 4 6 8 ...1 3 5 7 ...Just remember 4 Red, 6 Black.Other than that, it's pretty straight forward to assemble. The acrylic layers are not attached and you must keep them in the right order, so it feels a bit like shuffling eels for a moment or two, but as soon as the first screw is in place (the screws are long and run through every layer) the whole thing becomes more cooperative and it's a doddle.I ran my Pi4 without a case or cooling fan for a week before fitting the case, and it ran fine, and of course completely silently. The fan is very quiet, I feared it might whine because it's fairly small, but it just whispers - just a little soft white noise.What this product mostly seems to add to the Pi is funky aesthetics and confidence that you can pick it up without touching any critical components - it does protect the Pi somewhat. The downside is, it also turns a totally silent computer into merely a very quiet one.As someone very new to the Pi scene, my impression is that this is a good accessory and definitely one worth having.ADDENDUM: A few weeks on and I'm still delighted with this purchase. I did eventually realise that I had installed the fan incorrectly with the nuts on the outside and the heads on the inside, but it didn't take long to rectify. My Pi4 runs very cool and sweetly in this case. 😀ADDENDUM 2: I've fitted a breakout cable onto the GPIO pins thus losing availability of pins 4 and 6 to run the fan. It is possible to connect the wires from the fan to the breakout board to power the fan, but I found they fall out quite easily, although this doesn't matter too much in practice because although the Pi runs about 20°C hotter without the fan (typically 50s°C instead of 30s°C) it is still well below the maximum operating temperature of 80°C at which point the processor will start throttling back (which I haven't yet seen because mine hasn't ever been that hot). It's better to run cool, but not the end of the World if the fan isn't running, which also restores totally silent running.SUMMARY: I really like this product.
P**.
Cheap, cheerful and effective - but (a bit) fiddly!
Other reviews on here are accurate and read them first because they are helpful too.First up for a tenner, this is a good value for money case with cooling and it appears to be working well. I was using the standard pi case (from the Pi shop) and case open I was getting about 46-48 oC, when I put the lid on this was rising to 56oC and I had installed some small heatsinks already so these are passive air cooled temps (this comes with heatsinks too, so I have 'spares' ;).Fitting this (in full speed mode - which is still inaudible against the background of my 6 bay NAS etc. etc.) has resulted in temps of ~31/32oC which is a significant improvement.It looks quite good too I think.Installation is easy enough although it could be considered a little fiddly with small nuts and bolts/screws.MUST MUST keep the layers in the right order - having read this beforehand it was easy to do and it took me about 5 minutes to install it. I found putting the long screws in the base and working up was the easiest way. Means I have the bolts on top (could easily change that round) but I sorta like it that way.Also the fan is label side down i.e. internally facing, to get it to blow on the heatsink. This is the normal config I've been using for ever. Some might want it to suck, that's down to your choice...A tenner, and five minutes, later I have a much happier and cooler Pi. Can't argue with that.
C**C
Reduced the idle temp of my Pi4 from 86.5C to 47.2C
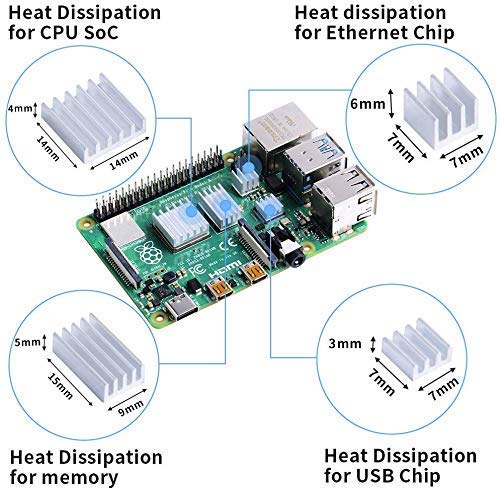
For quite some time, my Pi4, has sat at an idle temperature of about 76C (give or take a degree or two) in it's official case. Given that it throttles at 80C (not much headroom!) I thought I'd buy a small fan, retro-fitting it into the case after drilling holes in it and so on.In my search for suitably small fans, I came across this kit: an acrylic case with a fan. Given the price, and the "less hassle" factor, I thought I'd give it a try.I'm totally delighted with the results: when I came home this afternoon (in admittedly hot weather), the idle temperature of my Pi4 was ***86.5 degrees centigrade***. That is bloomin' TERRIBLE. But after fitting this case and fan, idle temperature under the same conditions have dropped to 47.2-50.6C (under load, it peaks at a magnificently unthrottled 64.8C).It's an absolute game-changer; the Pi4 is finally unleashed. And that's with the bare board, this case and nothing else -- I've not had to add a heatsink to the SOC or anything like that (which there is space to do, if you want even lower temperatures). But the baseline/default difference is quite remarkable. I'm genuinely delighted.Now for the not-so-good:The instructions for fitting this case amount to "don't disturb the order of the acrylic panels" and "connect the fan's cable to the GPIO header". They are almost entirely hopeless. Tiny, unhelpful pictures and hard-to-read text, and if you can confidently keep the panels in the right order you're a lot more competent then I am.Now. Consider the first part. I tried! I really did! But somehow, after my initial assembly, the order of my acrylic sheets wasn't quite right (it's quite fiddly, probably my fault) and I couldn't plug anything into the power or micro HDMI connectors as the bottom "lip" was in the wrong place. All I had to do was swap a couple of panels around and everything went together just fine, but there's no key in the instructions in case you get muddled.And it's the same for plugging the fan in; I had to look up the GPIO connector pins (red cable to +5V, black cable to ground) on the Internet -- the instructions are almost no bloomin' use whatsoever. (I keep saying "almost" for a reason -- you can just about see the wires leading to the bottom-right corner of the GPIO connector, but I spent *waaaaay* too long trying to figure out what I needed to do here to get the fan working).But after these teething issues, I'm quite delighted with the result. The case looks very nice indeed, the fan is quiet and my Pi4 now has some thermal headroom. Hooray!
N**I
Bonito y funciona bien
Toque moderno y funciona tal como se describe. Me gusta mucho.
H**H
Gehäuse in Ordnung
Das Gehäuse mit Lüfter und Kühlkörpern habe ich für meinen Raspberry Pi 4 8 GB zugelegt, da dieses Pi Modell gegenüber seinen Vorgängern deutlich mehr Abwärme produziert und dadurch bei Erreichen des Temperaturmaximums dann runtertaktet.Das Original Raspberry Pi 4 Gehäuse kann man daher getrost vergessen.Nach Anschauen von diversen YouTube Videos habe ich mich aus Kostengründen (wollte keine 40€ für ein Gehäuse mit super Kühler zahlen) für dieses Gehäuse entschieden.Wie bei vielen Rezensionen angemerkt, ist die Installation etwas fummelig.Was mich aber massiv gestört hat und zu einem Punktabzug geführt hat: es fehlt schlichtweg eine Installationsanleitung.1. für den fummeligen Zusammenbau des Gehäuses, was für mich nicht wirklich intuitiv war (und ich habe in den 00er/10er Jahren viel am PC und sonstigem Dingen geschraubt).Ich habe einfach auf YouTube eine Installationsanleitung von einem User gefunden. Das hat wirklich geholfen.2. die PIN Belegung für den Lüfteranschluss war ohne Anleitung auch nicht ersichtlich. Da bin ich beim Stöbern auf Amazon nach anderen Gehäusen auf ein Bild mit PIN Belegung gestoßen.Ansonsten ist das Gehäuse für den Preis in Ordnung.Geräuschpegel des Lüfters geht bei 5V Betrieb für mich völlig in Ordnung. Bei 3.3 V ist der Luftdurchsatz für mich zu gering, um ausreichend zu kühlen.Für Silent Fanatiker führt aber kein Weg an einen alternativen Lüfter bzw. Kühler vorbei.Mit dem beiliegenden Kühlkörpern den Raspberry Pi 4 unter Last rein passiv zu betreiben, kann man vergessen.Da muss man schon auf einen Kühler mit Heatpipes setzen, was auch bedeutet, dass man >20€ in die Hand nehmen muss.Jetzt schauen wir mal, ob das Gehäuse auch bei sommerlichen Temperaturen, was taugt oder ob ich doch auf ein Gehäuse mit verbesserter Kühllösung zurückgreifen muss…
A**K
Color Discrepancy
The acrylic case I received had a material quality that seemed promising, but unfortunately, the color did not match what was shown in the provided images. The disparity between the expected and actual color led to my decision to return the product. While the case itself appeared to be of decent quality, the color inconsistency was a disappointment.
R**D
Fan is way too big
They send me a fan which is way too big to screw in to the mounting holes
I**C
Basic quality
Basic quality
Trustpilot
1 month ago
2 months ago