🚦 Command Your Ride Like a Pro — Control, Customize, Conquer!
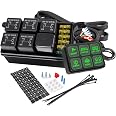
The NIRIDER 6 Gang Switch Panel is a universal 12V control system designed for trucks, SUVs, boats, and ATVs. Featuring six 40A circuits with plug-in relays, it offers a clean, easy-to-install solution with customizable LED-backlit touch switches. Built tough with IP54 protection, temperature safeguards, and reverse polarity defense, it ensures reliable, safe operation in any environment. Included accessories and 50 stickers make personalization and setup seamless, perfect for professionals who demand both style and function.
| Operation Mode | ON-OFF-ON |
| Current Rating | 40 Amps |
| Operating Voltage | 12 Volts (DC) |
| Contact Type | Normally Open |
| Connector Type | Plug In |
| Brand | NR NIRIDER |
| Terminal | Button |
| Circuit Type | 6-way |
| Mounting Type | Panel Mount |
| Actuator Type | Push Button |
| Contact Material | Aluminum |
| International Protection Rating | IP54 |
| Number of Positions | 6 |
| Control Method | Touch |
| Connectivity Protocol | X-10 |
| Color | 6 Gang Switch Panel |
| Wattage | 9.6E+2 |
| Unit Count | 1 Count |
| Number of Items | 1 |
| Manufacturer | Nirider |
| UPC | 612292096137 |
| Part Number | NR-4-18 |
| Item Weight | 3.25 pounds |
| Package Dimensions | 12.05 x 7.95 x 3.82 inches |
| Country of Origin | China |
| Item model number | 8542098568 |
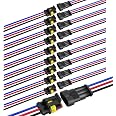
| Included Components | 6 gang switch panel, control box, 50pcs stickers, nylon wiring harness |
| Voltage | 12 Volts |
| Special Features | 6 gang design, Universal and compact design, Super clean and easy to install, Safe and durable, Green LED back lighting |
| Batteries Included? | No |
| Batteries Required? | No |
| Type of Bulb | LED |
F**H
There are installation issues if mounting space is tight but well worth the effort.
Yes, I do recommend this product. All six switches have been tested and deliver 12v power to the outlets when the vehicle's power is switched on. I am going to explain my context in case others have very limited space for mount a pod. If you have lots of room in you engine bay and reasonable choices for mounting points, then this lengthy explanation can be skipped. If like me you are space challenged, then hopefully this explanation can make your install a bit easier by helping you plan ahead.Context: I knew my install was going to be difficult because of the space constraints in my 2019 4Runner's engine bay. I already have dual batteries and an ARB twin compressor mounted on a Rago Fabrication mount. I pulled the compressor and mount out, cut off the 4" protrusion toward the firewall (ironically intended for mounting a pod but the protrusion is in a very tight and difficult to reach spot and blocks all reasonable access to the grommet through the firewall. Instead, I mounted the new switch pod unit on the underside of the to Rago mount with the two wire harnesses and outputs bundle pointing toward the front and reinstalled the compressor and pod into the vehicle. The reality is that the bundle (of six output wires) is way too short for this or any other tight fit situation!Depending on where the pod is mounted in your vehicle the short outputs can be a problem not only because the are short and difficult to reach but also because the male bullet connectors I purchased on Amazon (https://www.amazon.com/gp/product/B07T33BFX4/ref=ppx_yo_dt_b_asin_title_o05_s00?ie=UTF8&psc=1) are extremely tight and difficult to properly seat into the female bullet output connections on the unit. On two of the connections, I eventually had to carefully compress the the male ends a bit with nettle nose pliers, taking care not to get them out of round, and added generous dabs of dielectric grease to both parts to get them to seat properly. A much easier method, which I did not do but wished I had, is to add pigtails (while the unit is still on the bench) to extend them and make them easy to reach when the unit is mounted in a tight spot. This will also make the six extremely tight connections easier to overcome.To tidy up the install, I put the six leads onto a six gang distribution block also purchased on Amazon (https://www.amazon.com/gp/product/B07DM14L14/ref=ppx_yo_dt_b_asin_title_o00_s00?ie=UTF8&psc=1). I already had a negative/ground distribution block installed from the dual battery installation. It will now be easy to add new accessories -- just attach the positive and negative leads from the accessories to their respective distribution block.When finished, you will be able to add six accessories without worry about the need to find a switched fuse under the dash, and without having to run individual switches through the firewall into the dash area. You just attach the positive and negative leads and you have switched, safe relay and fuse backed power to you devises, without having to spend a small fortune on one of the leading brands. With each accessory, you will replace head scratching complexity with ease and you will avoid the mess of having six ungainly wire harnesses snaking through and around you engine bay.As a final note, take care to perfectly center the stickers onto the switch buttons. If you misalign even a little, the switches will stick and not work properly. I am providing pictures of my installation showing the one accessory I have already installed -- Baja Design Squadron Pro ditch lights.
I**T
Amazing product
This is a great product that is not only easy to install, but works great. Simply ground your accesory to the chassis and run a hot wire to one of the channels and presto. Youre done. The switch panel is nice and the optional lables to place on the switches is cool. Occasionally a button will stick, but its not a huge deal. I run several light bars, fans, standalone ECU, winch controller, and fuel pump from this. The relay and fuse box isnt very big, and was easily placed with a couplke of screws. I highly recommend this aginst more expensive switch controllers. For the pricepoint you cant beat it. It has allowed me to drastically clean up my engine bay from having so many seperate circuts running to my accesories.
B**S
Nice relay box.
Installed on my Ram 2500 to re-wire horrible plow and light wiring. Allows me to wire everything into my engine compartment and control from my cab. Kept the installation neat with the nicely wrapped wiring harness. Have no issue and would buy again if needed for another vehicle.Only negative would be there are not enough options on the button stickers. Not sure if there are additional options for those.
W**1
Appears quality! Green/ Yellow control panel lights.
Easy install, great function and light the green/yellow light. Blue is hard on night vision. The components appear to be good quality. I used an add a circuit to the switch power supply, the main power is dirrect battery. For best long term results use water proof wire connections. Good collection of 2x2cm stickers for control panel. Used this to control Fog, Low, high 1, High 2. High 1 is used with a 2nd relay and supply feed from my existing high beams allowing the highs to work in conjunction with my regular high beams, High 2 us always on. This gives me a few extra circuits for future use.
T**N
Great product for the money
you can buy much more expensive versions of these devices but in all honesty, i'm not sure you need to.this thing works very well.its very easy to install and includes everything you need to get it done. the only con i would say is the connections they chose to use. "butt" connectors. makes it rather difficult should you want to change things around. you basically have to clip the connector and use something else and there isnt a ton of wire to utilize should you want to do that. other than that, for $100 (more or less), its a really good way to control your accessories.2020 4Runner
K**E
Good product for the price.
Great product. The buttons to stick alittle. Install was fairly easy once I got all the support equipment for it. So far I have my front LED light bars and rear bumper lights attached and it has worked great. I do wish they offered a dimmer for the switch itself as it can be pretty bright at night.
J**.
Worked great, until it didn't
Installation was pretty straight forward. 12V line to the battery (or a hot post on the fuse block). 12V switched ignition for the light (add-a-fuse works great here) and a ground. Route the cable inside and hook up the switch panel. Run the positive line from your device and crimp it into one of the 6 provided butt connector ports. Easy-peasy.Tested the panel with a set of ditch lights and it worked as designed.Hopped in the Bronco tonight and headed down a dark road. Hit the switch to turn on the ditch lights and nada. The button clicks, but does not engage or change color. That switch (Port 3) is dead.Got home, swapped the lights to port 6 and they work again, but now my 6 gang panel is effectively a 5 gang panel.Of course, 1 day past the date to return.This was maybe the 4th time the switch button would have been used, so I'm not sure why it failed other than it was not well engineered or defective. However, since I'm now 1 day past return, it's mine.Would not recommend this product, even at this price point.
Trustpilot
1 month ago
3 weeks ago