🌪️ Elevate your garden vibe with the wind-powered wonder everyone’s talking about!
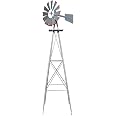
The VINGLI 8FT Ornamental Windmill is a striking garden decoration crafted from rust-resistant steel, standing 8 feet tall with a 26-inch blade diameter. Featuring a bolted 4-leg anchorage system for stability and smooth, quiet rotation powered solely by wind, it combines durability with effortless functionality to enhance any outdoor space.


| Additional Features | Rust Resistant |
| Item Dimensions W x H | 26"W x 96"H |
| Material Type | Steel |
| Blade Shape | Round |
| Color | Gray |
G**J
Tall and nice BUT warning!
Rated 5 stars! Absolutely confusing as heck to put together but when you figure it out it’s beautiful. Good price. Good deal. Works great. Please update the instructions.Edit-I went outside and the windmill was on the grown and two legs creased. It was attached to the ground with the pins provided but it creased at two of the legs. It fell so hard that even the blades bent. I have contacted the seller 4 times and no response yet. How do they expect you to undo all of the parts, box it back up and send the original back all BEFORE getting any help, refund or replacement? The legs definitely need to be stronger. You can literally bend them with your bare hands! How do I know? I tried to bend them back to see if it would still stand. They bent back like butter but failed to stay. I am in S TX and we have little to no wind but it fell anyway. Should be strong enough to hold up in little to no wind. If I get any response from the seller, I’ll update. Otherwise I changed to 1 star because this windmill is ridiculously weak and so is customer service.Edit-seller responded and placed windmill. Changed back to 5 stars!
M**Z
Love it
The media could not be loaded. I like this windmill very much. Takes a little time assembling but is a great conversation piece and looks great up here on top of the mountain !Also ... if you live in an area where you get strong winds... 15-30 mph or more , you definitely are going to need to anchor it to the ground in some fashion! I tried the steaks that are included and they are kind of a joke and worked half okay for about 1 day before they were pulled out of the ground and rendered useless.I live on top of a mountain where we get very strong winds sometimes and this thing will blow over if not anchored because remember, this is purely ornamental! It's not super heavy duty it's not extremely heavy the whole thing probably weighs 5 to 10 lb if that, so I used a ground rod cut into four pieces so they were approximately a foot to a foot and a half long and I pounded those into the ground at the base of the windmill and piled some larger rocks around each leg at the base. I have had 35 mph wind since I installed this and it stays perfectly still and the blade does spin extremely fast especially now that I have lubricated the blade bearings and where the blade drops into the top of the windmill I lubricated that very well so it will not rust over time and that allows it to really spin and completely quietly.For the price you can't beat this I have seen other similar windmills in local stores for $200 that aren't as nice as this... so for the price, for a very nice looking ornamental windmill you really can't go wrong.. !
H**F
These instructions and photos will help to assemble!
The writers of the instructions must have assumed that buyers don’t need instructions, so they gave us a few pictures, sort of! Therefore, here are some things that this mechanically-skilled 75-year-old woman figured out. Granted, these instructions aren't perfect, but with the photos, they are better! Just possibly someone else can assemble their windmill is less than 6 hours.PREPARATION:1. Open the box in a place where you can easily vacuum up the hundreds of escaping tiny pieces of hard Styrofoam.2. Have a large work surface to spread out all the pieces.3. Have three or four small bowls to sort the bolts, nuts, washers, and cotter pins, which come in one envelope. (The included instructions call bolts “screws.”)4. You will need a Phillips head screwdriver, a 5/16 open end wrench, and needle-nose pliers.5. For the sake of appearance, insert bolts from outside toward the inside.6. Initial assembly can be done indoors, but at halfway, move outside due the height of the windmill.7. Two sawhorses come in handy for the final assembly to support the tilted windmill. (You need to lower it to reach the top.)8. Corner Legs: There are 12 Corner Leg pieces. The 4 shorter ones are the top of each leg. The 4 of the longer ones with a large hole in one end are the bottom of each leg. The other 4 of the longer ones are, of course, the middle of each leg.9. Braces: There are 16 “longest” Braces which are the diagonal supports. There are 8 Braces which are the horizontal supports; the 4 shorter ones form the middle box, while the 4 longer ones form the bottom box. The holes in the ends of the Braces tend to be small, making it impossible to get a bolt through unless “screwed through.”ASSEMBLY: {The photos are out of order in the published review. Sorry.}1. Assemble the spinner (Wheel) unit first. [photos 1, 2, 3]. There are 2 Tiller pieces. The Linker rod and the Rudder are sandwiched between these 2 Tiller pieces. To attach the Wheel (spinner) to the Linker, put a large washer on the rod, then the Wheel, then another large washer. Then put a cotter pin through the hole at the end of the Linker, and then use pliers to spread the prongs of the cotter pin, to keep it from sliding back out. Set this unit aside for now.2. The top section. Each of the 4 Corner legs of the windmill consists of 3 pieces which are bolted together. Start with the shortest 4 Corner Leg pieces.3. [photo 4] Using a bolt, attach a Leg piece to each of the 4 holes in the boxy Master Head. Next put a small washer on the bolt. Then put on the nut but leave slightly loose. This stage is very awkward because the legs are loosely attached and they flare out as they are supposed to—4 legs moving everywhere!4. [photos 5, 6]. Attach a longer Leg piece to each of the Leg pieces you have just put on the Master head. The indented end of these pieces fits inside the piece above it. Washers are not used from now on. Do not securely tighten yet because crossbar Braces are coming.5. Now attach the third Leg piece to each leg, the piece with the large open hole which is the bottom of the windmill.6. [photo 7] Stand the windmill upright and slide the flat Platform on top, sliding it down to the first set of bolt holes on the Legs. (smooth side up).7. [photo 7]. Select 8 of the 16 longest Braces and include one end of each on the Bolt used for attaching the Platform to the Corner Legs. The Braces dangle loose for now. Leave the nuts and bolts loose for now. That finishes the top section.8. The middle section. Select the remaining 8 “longest” Braces, and the 4 mid-sized (Center) braces. These 4 mid-sized braces will form a square box horizontally.9. [photo 8, 9] Pull a long Brace diagonally from the top to the side (the holes will match up). Then bolt – all 3 at the same time -- the diagonal Brace, another “longest” Brace which will dangle down for now, and one end of a Center brace. Do this for all 4 corners. [photo 10] The 4 Center Braces form a horizontal square box. That finishes the middle section.10. The bottom section. You probably need to take everything outside now because the windmill is getting too tall for most ceiling heights. Pull each dangling Brace diagonally to the side. Place one end of the remaining Braces (Bottom) with it and secure with bolts. [photo 11] This forms another horizontal square box.11. You now have all the long braces secured diagonally, and all the center braces secured in two square boxes.12. Now go back and securely tighten all the bolts and nuts with your wrench and screwdriver. (An open-end wrench works better than a closed end because of the small spaces.)13. [photo 12] To finish the windmill, lean the whole thing down (on sawhorses, perhaps) and put the Wheel unit on: Place a large washer on the rod extending down from the Tiller, insert the rod through the hole in the Master Head, and then put a cotter pin through the small hole in the bottom of the rod. Using pliers, spread out the prongs of the pin to prevent the pin from coming out.14. Place the windmill on the ground where you want it and then put a Ground Stake through the hole in each Leg. [photo 13--This photo shows the old stakes I used because they were longer.]15. [photo 14] Wait for some wind and enjoy watching it spin! It was worth the effort!
T**I
Great windmill!
I love this windmill! My husband put it together for me by himself. Took him about an hour. I put it in my raised garden beds with the idea it would keep birds away, plus I think it looks cute. I'm hoping some of my veggies use it as a trellis. There is a pin at the top to take off the cap which I'll do when it gets windy. It comes with stakes which I would recommend using.
R**Y
Love it
This windmill is sturdy and eye catchingOnce you figure out how to put it together ( the instructions are not very helpful)I watched a few YouTube and it was very helpful
Trustpilot
2 days ago
2 months ago