🛡️ Protect Your Ride, Elevate Your Style!
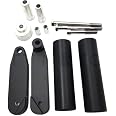
The HTTMT MT219-058-BK No Cut Frame Slider is a high-quality protective accessory designed for 2008-2013 Kawasaki Ninja 250/250R motorcycles. Made from durable Delrin material, these sliders provide essential protection for your bike's frame, engine cases, and bodywork, ensuring minimal repair costs in the event of a fall. With a lightweight design and no-cut installation, they offer both functionality and aesthetic appeal.
| Manufacturer | TTMT |
| Brand | HTTMT |
| Item Weight | 2.88 pounds |
| Package Dimensions | 8.31 x 5.83 x 2.76 inches |
| Country of Origin | China |
| Manufacturer Part Number | USMT219-058-BK |
T**E
Looks good once you figure it out
With the help of my brother we got these installed with a lot of trial and error. Since there are no instructions hopefully my review will help in some way.(Anything in Red connects with Red. Anything in Blue connents with Blue)To note: The 2 black pegs come in slightly different lengths. A is longer than B.G & F also look very similar but G is fatter and F is skinnier.1. To begin, G (the fatter one) inserts into A and you will want to connect A with E (the big silver spacer) at point 1 using J (the shorter of the 2 Allen bolts). So the big silver spacer should be paired with the slightly longer black peg.2. Next, F will insert into B (the slightly shorter black peg) and you'll use K (not pictured) to connect it to point 23. H & I are the two hex bolts, one is longer than the other. You'll take the longer one (H) and connent it to the B peg at point 4.4. I, which is the other hex bolt and is slightly shorter in length, will connect to A peg at point 4.5. The two L's will go on the end of the two hex bolts H & I after they are inserted into the engine mount. (they are exactly the same so it doesnt matter which one)6. Once all the the components are connected you'll need to remove the side fairings and jack up the engine so the engine is held in place. (We used a floor jack with the side stand down)7. The two hex bolts H & I are going to replace the 1 rod in the engine mount.8. Once you have one hex bolt in, you'll need a wrench for the hex bolt and an allen key to hold L in place and you'll do this on both sides.You can then remove the jack & install the fairings back on.
K**R
Melted and fell off!
After a few months of being on my bike, it melted and then fell off! Unfortunately, soon after it fell off, my bike was dropped by my son who was learning to ride! So the entire point of buying them to protect my new paint job, was pointless. Besides that, it was very challenging to get them on. My husband had a lot of troubles getting them on correctly.
K**T
Not bad for the money.
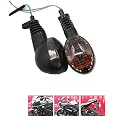
The media could not be loaded. So all in all I guess I’d say I’m overall pleased with the product. It took a while for my fiancé and I to figure out how exactly these are installed. Once we figured it out it was fairly easy installation. I attached photos and videos in hopes it will help others who buy this product. I have a 2012 Ninja 250 and these fit very well. Haven’t been able to “try” them out yet but hopefully I won’t. If I ever do I will update the review!
M**B
Mostly saved my bike
Don't get me wrong these were a pain in the tush to put on without instructions, but the other reviewers helped ease that pain 🤣But fr it helped save my motor when I put my bike in the ditch this past weekend! I will say though, it did not feel very good on my leg. I now have a big ass knot on my inner thigh but that was the extent of my personal damage. Idk if it was what ripped my plastics or if it was the ditch but I do have to replace them.All in all I am very pleased with the product. The only reason for the 4 stars instead of 5 is no instructions 🤷🏽♀️
J**J
Well worth the money
I put these on my daughter's 2008 Ninja 250 in about an hour. Thanks to the other reviews that helped get me started. Hopefully my photos will add a little to help people get them installed so that they're even on both sides.I'll give you an overview of the install process...1) take off the fairings on both sides2) put a jack under the engine with just a little pressure to help hold it up3) the engine is held in place with a really long bolt with a nut on the right side (at least it was on the right for me, figure it out for your bike). Take that nut off4) You need to get that long bolt out. On the side where the bolt was, start tapping the end of the bolt with a hammer. Once it goes inside the hole, put a long screwdriver in the hole and tap the handle. Watch the left side and make sure the bolt isn't being pushed into the radiator hose. You can tap the bolt all the way out or do what I did and tap it most of the way, leaving some of it in the hole to help support the engine.5) Put the slider on the right side (or whichever side the bolt is not in, if your bolt was put in the other way). Just stick the bolt in the hole and let it dangle, but push the bolt in as far as possible, possibly using the hammer if needed.6) Behind the radiator is a track where you can see the bolt. Put a "nut" into that track and hold it there while you start turning the bolt to get the nut started. (The "nut" is Part L on the image uploaded by the other user, it's a 1 inch long tube with threads on the inside). Once it starts to get tight, the "nut" will turn with the bolt. It has a hole in the side of it. Stick a small screwdriver into that hole and continue tightening the bolt. As the bolt gets tight, move the slider into position so the little tab on the bracket sits up against the lower fin on the engine.7) Go to the other side and take the old bolt all the way out if you haven't already. If it doesn't pull out, try loosening it with a socket. The threads will probably grip enough that it'll back right out. Repeat step 5-6 for the this side.8) Put everything back together and hope you never need these sliders
G**A
not compatible
doesn’t work with ninja 250 - doesn’t fit. didn’t come with instructions i tried but had no idea what i was doing even with the help through reviews
E**.
Tighten them all the way
Was pretty easy to install because of other reviews and they looked good except one of the screws came out from the vibration on the freeway and it ended up melting as they are plastic but they are good quality just make sure you tighten them as tight as possible
T**.
Lacked installation instructions, and one of the bolts included was 10mm too short
Lacked installation instructions, and one of the bolts included was 10mm too short - I had to source a replacement myself. Haven't crash tested yet. Still - good fit and design.
Trustpilot
5 days ago
2 months ago